
Most people start with the gear question.
What microphone should I buy? What camera? Do I need acoustic panels? They spend three weeks on Reddit comparing XLR interfaces and then never record a single episode.
The gear isn't the problem. The order is.
I've spent 30 years in video and audio production. I've worked with camcorders, DSLRs, broadcast rigs, and smartphones. And when I finally sat down to build my own home studio for podcasting, I made the same mistake everyone else makes. I started with the gear instead of the room.
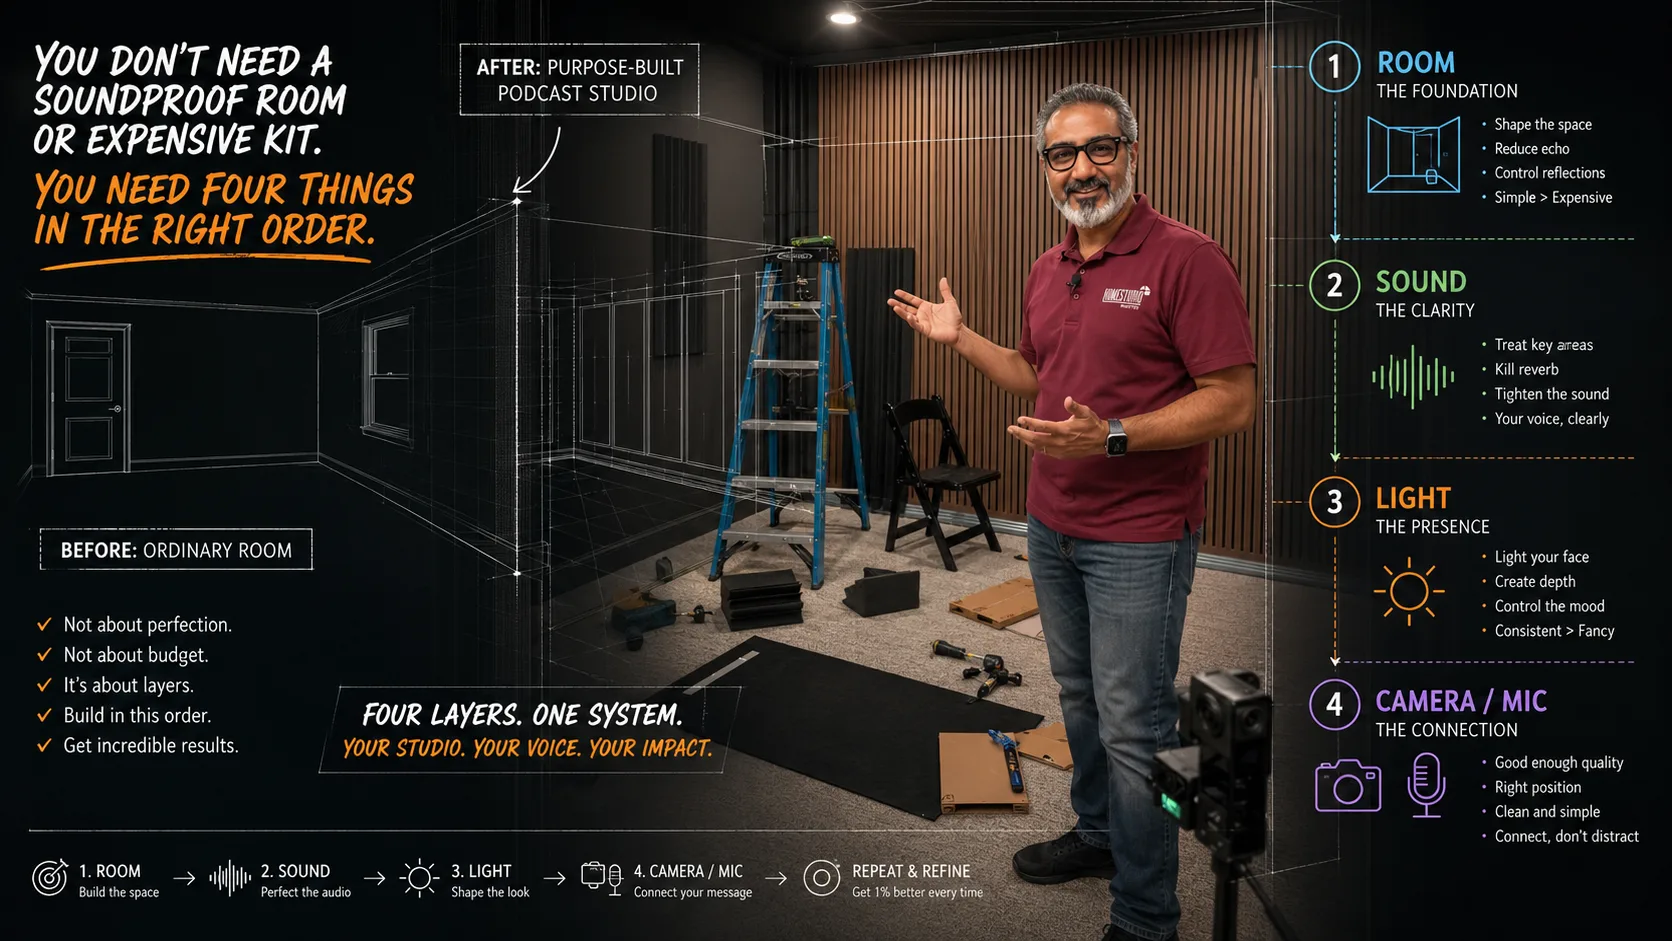
Here's what I learned: four things determine whether your studio sounds and looks professional. Most people get one right. The ones who get all four are the ones whose guests say yes, whose listeners stay, and whose shows actually compound over time.
1. The Room First
Before you buy anything, look at what's already behind you.
Walk into the space you're going to record in. Clap once, sharp and loud. If you hear a ringing echo, you've got a problem that no microphone can fix.
Hard walls reflect sound. Soft surfaces absorb it. Bookshelves full of books are some of the best acoustic treatment you can buy, and you might already have them. A couch, rugs, curtains, a closet full of clothes: these all work. You're not trying to build a recording studio. You're trying to reduce the flutter echo enough that your voice sounds clean.
The other thing the room gives you is the visual. What does the camera see behind you? If it's a blank wall, you're invisible: technically present but visually forgettable. What's behind you communicates who you are before you say a word. A bookshelf, a curated wall, some controlled lighting: these things build authority passively, while you talk.
Start with the room. Everything else is secondary.
2. Audio Second
Here's the hierarchy for podcast audio, in order of impact:
The room (see above). A mediocre microphone in a treated room sounds better than an expensive mic in a live, echoey space.
The microphone. For most podcasters starting out, a USB mic is fine. The Blue Yeti, the Rode NT-USB, the Samson Q2U: any of these will record clear audio if the room is treated. Dynamic mics reject more room noise than condenser mics, which matters if you're recording in a less-than-ideal space.
Your distance from the mic. Six to eight inches is the sweet spot for most dynamic mics. Too close and you get proximity effect: that boomy, over-processed sound. Too far and you're recording the room instead of yourself.
Headphones. Closed-back headphones during recording so you can hear if something's wrong before you've recorded 45 minutes you can't use.
That's the whole audio setup. Most people add more stuff than they need. The room and a decent mic at the right distance will get you 90% of the way there.
3. Lighting Third
Two things kill the visual quality of a podcast more than anything else: a cluttered background and bad lighting.
Lighting is simpler than it looks.
One soft key light positioned slightly to the side of your face, not overhead, not directly in front. Overhead light creates shadows under your eyes that make you look exhausted. A ring light directly in front flattens your face and puts a visible circle in your eyes in close-ups.
A simple LED panel with a diffuser, or even a window to your side on an overcast day, will give you a more professional look than most ring lights at any price.
If you want to go further: a second fill light on the opposite side at lower intensity, and something behind you to separate you from the background. That three-point setup is what broadcast studios have been using for decades. It works.
The camera matters less than you think. If the lighting is good, a smartphone or a decent webcam will look professional. If the lighting is bad, a $3,000 camera still looks bad.
4. Camera Last
Yes, last.
The camera is the thing everyone wants to talk about first, and it's genuinely the least important decision in the hierarchy. A well-lit room with good audio and a phone camera is more compelling to watch than a poorly lit, echoey space shot on professional gear.
That said, here's what I'd actually use if I were starting from scratch:
A webcam (Logitech Brio or equivalent) if simplicity matters. Plug and play, no fuss.
A mirrorless camera like the Sony ZV-E10 or Fuji X-S10 if you want that shallow depth-of-field look that separates you from the background. You'll need a clean HDMI output and a capture card (Elgato Cam Link works).
A smartphone with a tripod mount and the right app if that's what you have. The cameras in current iPhones and Android flagships are genuinely excellent. Don't let anyone tell you otherwise. I wrote a whole book on it.
The order matters more than the budget
I've worked with podcasters who spent $2,000 on equipment and sounded worse than someone with a $79 USB mic because they skipped the room.
I've also worked with podcasters who started with a smartphone, a lamp, and a closet full of clothes, and built shows that sound and look completely credible.
The formula isn't about money. It's about sequence.
Room → Audio → Lighting → Camera.
Get that order right and everything else is just refinement.
If you're still figuring out where to start, what it actually takes to launch is worth reading first. The studio question comes after you've answered the show question.
And if you want someone to look at your specific space and tell you exactly what to change, that's what I do. Reach out and we'll talk through it.